LISP Lab
In this lab we will configure a simple topology so that the Loopback0 interface on R1 can ping the Loopback0 interface on R2 via LISP.
IOS version used in this lab: 15.4(1)T

In this lab we will configure a simple topology so that the Loopback0 interface on R1 can ping the Loopback0 interface on R2 via LISP.
IOS version used in this lab: 15.4(1)T
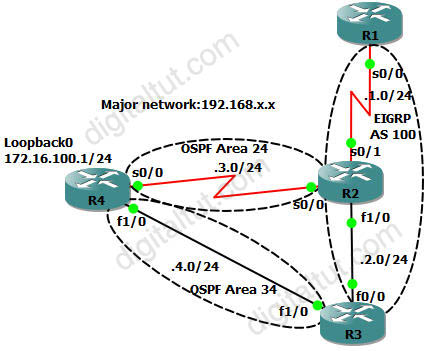
In this lab we will learn when different types of LSA will be created. The main topic of this lab is LSA Types 1, 2, 3, 4, 5, 7. If you need to review your OSPF LSA Types knowledge, we recommend you to read our OSPF LSA Types Tutorial first.
Lab topology
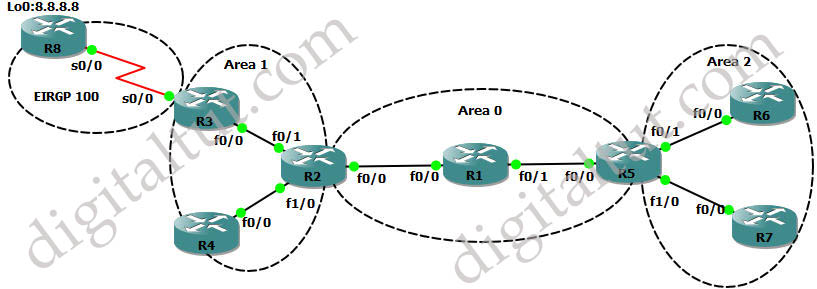
You can download the initial configuration file of this lab here: http://www.digitaltut.com/download/OSPF_LSA_Types_Initial.zip.
In this lab we will learn how to use Policy Based Routing to send traffic via the route we want.
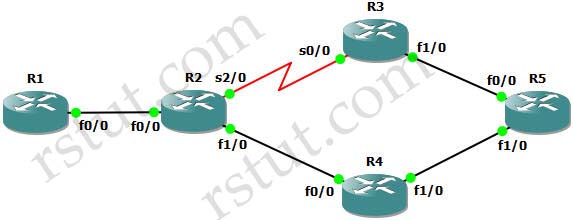
IOS used: c3640-jk9s-mz.124-16.bin
Tasks
+ Enable OSPF on all interfaces of R2, R3, R4, R5 using only one command on each router.
+ Create Policy Based Routing on R2 so that traffic from R1 to the Loopback interface of R5 (5.5.5.5) must go through R3 (the less optimal path).
You can download the Initial Config Lab here: http://www.digitaltut.com/download/Policy_Based_Routing_Lab_Initial.zip.
In this small lab we are going to see and learn about the Null0 when a summarized route is created. The topology is simple with only two routers.
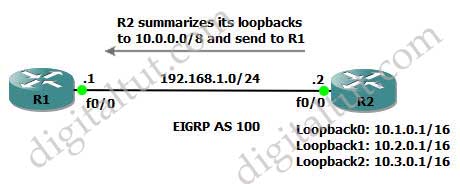 The purpose of this lab is to summarize all Loopback interfaces on R2 via auto and manual summarization and advertise it to R1.
In this GNS3 lab we will learn how to redistribute from EIGRP into OSPF and vice versa. Below is the topology used in this lab:
The purposes of this sim are:
+ Redistribute from EIGRP to OSPF and vice versa.
+ Traffic from R1 to R4 must go through the best path (after redistribution, traffic from R1 will go R1 -> R2 -> R4; this is not the most optimal path as it must go through 2 serial links. The best path is R1 -> R2 -> R3 -> R4 and we have to configure the routers to complete this task.)
You can download the initial configuration of this lab here: http://www.digitaltut.com/download/EIGRP_OSPF_Redistribute_initial_configs.zip.
Initial Configurations (which have not had the redistribute command yet):
| R1(config)#interface s0/0 R1(config-if)#ip address 192.168.1.1 255.255.255.0 R1(config-if)#no shut R1(config-if)#exit R1(config)#router eigrp 100 R1(config-router)#network 192.168.1.0 |
R2(config)#interface s0/1 R2(config-if)#ip address 192.168.1.2 255.255.255.0 R2(config-if)#no shut R2(config-if)#interface f1/0 R2(config-if)#ip address 192.168.2.2 255.255.255.0 R2(config-if)#no shut R2(config-if)#interface s0/0 R2(config-if)#ip address 192.168.3.2 255.255.255.0 R2(config-if)#no shut R2(config-if)#exit R2(config)#router eigrp 100 R2(config-router)#network 192.168.1.0 R2(config-router)#network 192.168.2.0 R2(config-router)#exit R2(config)#router ospf 1 R2(config-router)#network 192.168.3.0 0.0.0.255 area 24 |
| R3(config)#interface f0/0 R3(config-if)#ip address 192.168.2.3 255.255.255.0 R3(config-if)#no shut R3(config-if)#interface f1/0 R3(config-if)#ip address 192.168.4.3 255.255.255.0 R3(config-if)#no shut R3(config-if)#exit R3(config)#router eigrp 100 R3(config-router)#network 192.168.2.0 R3(config-router)#exit R3(config)#router ospf 1 R3(config-router)#network 192.168.4.0 0.0.0.255 area 34 |
R4(config)#interface s0/0 |
After finishing the initial commands above, the routing tables of each router are shown below:
In this lab we will learn how to use Route map to set MED attribute to tell which path the neighbor should choose to a specific network.
Topology:
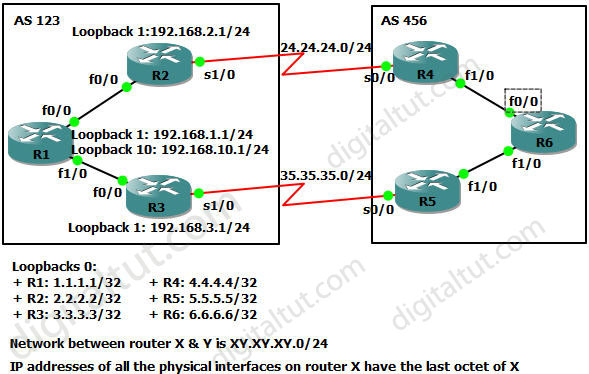
IOS used in this lab: c3640-jk9s-mz.124-16.bin
Tasks in this lab:
1) Set up basic IBGP & EBGP
2) Advertise loopback 1 & loopback 10 on R1
3) Use route-maps on R2 & R3 to set MED for only 192.168.1.0, verify on R6 and will R6 see network 192.168.10.0?
In this lab we will learn how to aggregate (summarize) small networks into a bigger one. Below is the topology used in this GNS3 lab.
IOS used: c3640-jk9s-mz.124-16.bin
Task: Summary networks 10.10.10.0/24 & 10.10.20.0/24 into 10.10.0.0/16
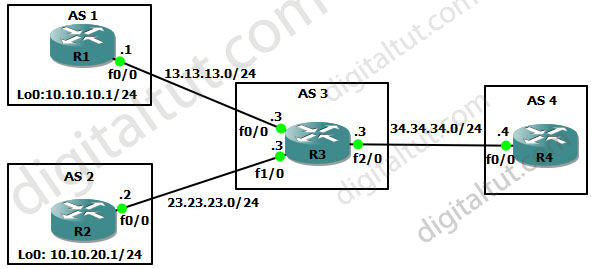
In this lab we will learn how to use distribute-list to filter unwanted routes in BGP. Below is the topology of this lab:
IOS used in this lab: c3640-jk9s-mz.124-16.bin
Objectives of this lab:
+ Task 1: Configure EBGP on AS 1, AS 23, AS 4 and configure IBGP between R2 & R3 (AS23), also advertise loopback 0 interface on R1 so that all the routers learn about this network.
+ Task 2: Use a distribute-list to filter out network 1.1.1.0
Let’s start our lab!
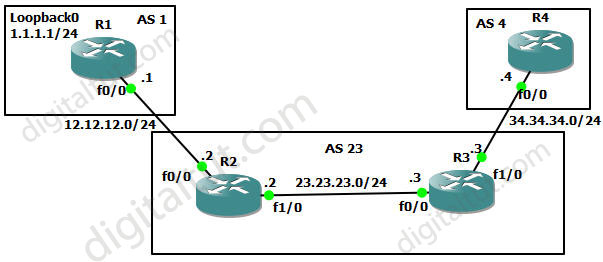
In this GNS3 lab we will learn how to establish neighborship between routers running BGP and use BGP attributes to control how a route is advertised to its neighbors. In this lab I wish to show how to create a basic “BGP network” and explain about next-hop-self, community no-export & send-community features in BGP. Below is the topology of this lab:
IOS used in this lab: c3640-jk9s-mz.124-16.bin
Objectives of this lab:
+ Task 1: Configure EBGP on AS 1, AS 23, AS 4 and configure IBGP between R2 & R3 (AS23)
+ Task 2: Advertise loopback0 on R1 to R4 and make sure R4 can ping to that loopback interface (AS23 becomes a transit AS)
+ Task 3: Make AS 23 not a transit AS by using the feature “community no-export”
In this GNS3 lab we will learn how to redistribute from EIGRP into OSPF and vice versa. Below is the topology used in this lab:
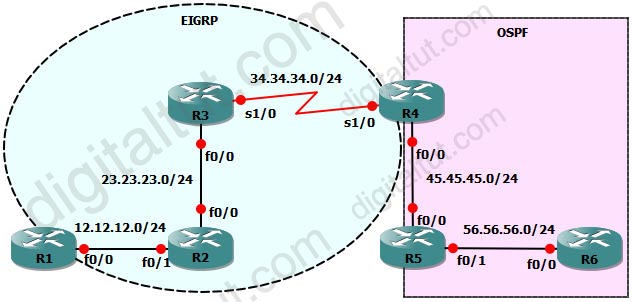
First we assign IP addresses to all interfaces on the routers. Notice the 4th octet of the IP address of each router has the same value of the name of that router (for example R2 has 2 interfaces 12.12.12.2 & 23.23.23.2; R3 has 2 interfaces 23.23.23.3 & 34.34.34.3…)
In this tutorial we will connect two routers via static route with GNS3.
Static route and Dynamic route
Static route tells the device exactly where to send traffic, no matter what. Static route is often used when your network has only a few routers or there is only one route from a source to a destination. Dynamic routes, on the other hand, use a routing protocol to determine the best path and the routes can be changed depending on specific parameters (like bandwidth, delay, cost…). With dynamic routes, routers can communicate with each other to exchange routing information. In ROUTE 642-902 you will learn about dynamic routing protocols such as OSPF, EIGRP and BGP (RIP is also a dynamic routing protocol but it is not mentioned in ROUTE).
The simple syntax of static route:
ip route <destination><subnet mask><next hop IP address or outbound interface>
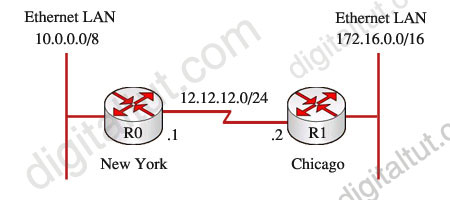
Now we consider a real-world example of static routing. Suppose that your company has 2 branches located in New York and Chicago. As the administrator of the network, you are tasked to connect them so that employees in the two LANs can communicate with each other. After careful consideration you decided to connect them via static route.
In this tutorial we will use GNS3 to do a very basic task to secure your routers – apply a password so that users will be asked for this password when try to enter the privileged mode. For example:
Router>enable
Password: ******* (enter that password here)
Router# (this is the privileged mode)
Now let’s start!
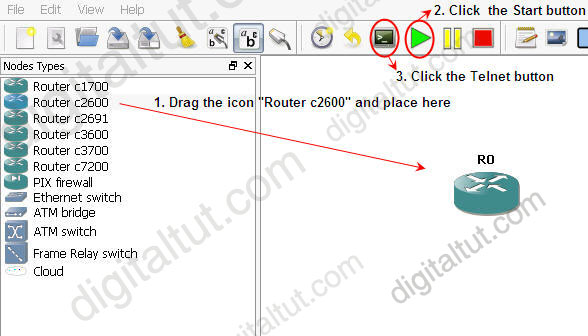
First launch the GNS3, for this tutorial I use the IOS c2600-bin-mz.123-6f.bin but this is a very fundamental lab so you can use any IOS you have.
1. Drag the Router c2600 the place it onto the right-side box,
2. Click the Start button (the green triangle button)
3. Click the Telnet to all IOS button (the black button) to open the Telnet command line interface (CLI).
Become a member to read all the tutorials, labs on our site!

